
Respiratory disobstruction manoeuvres - anti-suffocation in infants
Learning the manoeuvres of airway disobstruction in infants is fundamental: infants (this is how babies in their first year of life are defined) as we know explore the world with their mouths and the probability of suffocation is higher than at any other time of life
Many studies have been done to understand which are the most useful disobstructive manoeuvres and many of the international scientific societies dealing with emergency medicine (such as the American Heart Association or the European Resuscitation Council) have drawn up guidelines that have helped save many lives.
These manoeuvres should in fact be known by everyone, doctors and non-medics alike.
Fortunately, today many associations regularly run theoretical and practical courses to teach them correctly.
CHILD HEALTH: LEARN MORE ABOUT MEDICHILD BY VISITING THE BOOTH AT EMERGENCY EXPO
Infant rescue: what are the respiratory disobstruction manoeuvres and what are they for?
Anti-breathing manoeuvres are very simple gestures that, when done well, can save a child in more than 90% of cases.
When an infant’s airway is obstructed by a foreign body, oxygen can no longer reach the blood.
All our organs need oxygen to function, but one of them is particularly sensitive: the brain.
It only takes a few minutes (about 4) of a lack of oxygen to cause damage to our brain cells, which begin to die after about 10 minutes. Early intervention is therefore essential!
When to do (and when NOT to do) respiratory disobstruction manoeuvres in infants?
One of the most important things to learn is to be able to recognise the situation in which the manoeuvres should be performed.
In fact, it can happen that, if performed at the wrong time, anti-breathing manoeuvres can even make the situation worse!
Fortunately, it is very easy to know when NOT to do them: all we need to do is hear if our baby coughs.
In fact, coughing is a reflex with which nature has endowed us precisely to free our airways from foreign bodies, and it is the strongest and most effective mechanism for unblocking.
As long as there is a cough, in fact, we do not have to do anything at all!
So, even if we are strongly tempted, ABSOLUTELY AVOID putting the infant upside down, giving him or her a drink, giving strong pats behind the back, putting our fingers in the mouth or shaking him or her.
In fact, all these manoeuvres can hinder coughing, which is the most effective means (even more effective than manoeuvres!) with which we are equipped to unstick ourselves!
In addition, as long as the cough is present (or the baby cries screaming and emits intense sounds), it means that the airway obstruction is only partial so air still has a chance to reach the lungs.
It may happen, however, that the cough does not appear from the beginning or at a certain point it may stop and the baby will no longer emit any sound (crying, words) and in a few seconds will become cyanotic (cyanosis means a bluish colouring of the skin): in these cases it is essential to intervene immediately with anti-suffocation manoeuvres!
It should be emphasised that all deobstructive manoeuvres tend to emulate the coughing mechanism, trying to compress the rib cage, which in the infant is still not very ossified and therefore very elastic, in order to make the air ‘pump’ from the bases towards the upper airways and thus get the foreign body out.

As mentioned above, none of these manoeuvres is as effective as coughing, so if the baby should return to coughing after starting the manoeuvres, the operator must also limit himself to encouraging the coughing mechanism, without intervening further.
VISIT THE DMC DINAS MEDICAL CONSULTANTS BOOTH AT EMERGENCY EXPO
How are the disobstruction manoeuvres performed in infants?
After loudly calling for help and having 118 called (the basic concept of the so-called “rescue chain”), we prepare to perform the manoeuvres, which are carried out according to the following steps:
- With one hand we grasp the child’s jaw, forming a sort of letter ‘C’, obviously taking care not to compress the neck. This gesture, apparently useless, is instead of fundamental importance to stabilise the child and to perform the manoeuvres correctly.
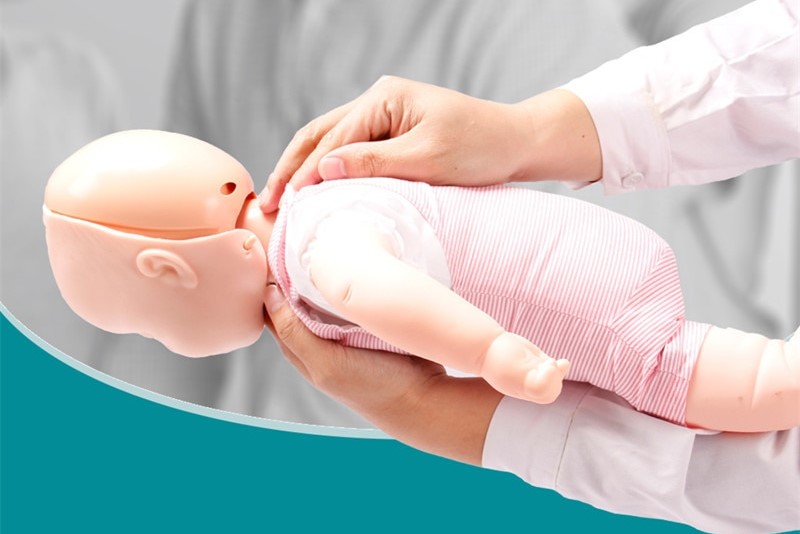
- After sitting or kneeling, we position the infant on his stomach and in a slightly sloping position (with the head slightly downwards) on the same forearm as the hand with which we hold the jaw (the forearm is the part of the arm that goes from the elbow to the hand). The child’s legs can form a sort of clamp on our arm. This will allow you to pin his leg between your hip and your arm.
- Once you have positioned and stabilised the infant, you will proceed by administering 5 interscapular pats with a lateral escape route (Figure 1). What does this mean? That with the initial part of the palm of my hand I will have to give 5 pats on the baby’s back, to be precise in the middle of the shoulder blades. Furthermore, to avoid hurting the infant (e.g. by hitting his head) I will have to make my hand ‘escape’ sideways. But should these ‘pats’ be strong or weak? We know that when you have an infant in front of you you are always afraid to use force, but in this case you have to be brave and give five strong, intense pats (obviously without exaggerating!). If they are in fact too weak, they will not succeed in dislodging the foreign body and risk being completely useless! Remember a fundamental message: our aim is not to ‘get to 5’, but each pat must be given with intensity and precision, as if it were the decisive one! If in fact they are done well, in most cases already after the first 2-3 we will have succeeded in our aim of unsticking the infant!
- If the pats have not had the desired effect then we must continue by performing 5 chest compressions: with the hand with which I had done the pats I take the occiput (the nape or back of the baby’s head) and turn it over, this time on its stomach but still in a slightly sloping position, placing it on the other forearm. The legs can be placed, as before, in a pincer position on our arm so that the infant’s leg is clamped between the operator’s arm and chest. Once this is done, I will proceed with the 5 chest compressions: I will place two fingers (usually index and middle fingers, but middle and ring fingers are also fine) exactly in the middle of an imaginary line joining the baby’s nipples (if the fingers are well positioned they will then be on the central bone of the rib cage, called the sternum). The fingers should be straight and stiff, like two drumsticks (if you have very long nails, try to keep the fingers as straight as possible!). When well positioned, one proceeds to apply the 5 compressions, which again should be intense and deep. The compressions must not be too fast, and time must be given for the chest to re-expand before compressing again; otherwise the compressions will be less and less effective as the manoeuvres continue. Indeed, let us not forget that the aim is to move a foreign body that is obstructing our infant’s airway!
What to do if the respiratory – disobstruction manoeuvres do not work?
In this case, after a few minutes, our infant will inevitably become unconscious.
When this happens, it is necessary to stop with the anti-suffocation manoeuvres, make sure that 118 has been called (if not, call it immediately!) and begin cardiopulmonary resuscitation, by means of cardiac massage and mouth-to-mouth breathing (in very small infants, breathing can also be performed by incorporating both mouth and nose).
QUALITY AED? VISIT THE ZOLL BOOTH AT EMERGENCY EXPO
Once the baby is placed on a hard surface (even a normal table is fine!) and the chest is uncovered, you will proceed by alternating 30 chest compressions (always placing your fingers in the centre of the line joining the two nipples) and 2 mouth-to-mouth breaths.
You will continue these manoeuvres for as long as possible, stopping only if the baby recovers or when the emergency services arrive.
After the first 30 compressions it may be useful to quickly inspect the baby’s mouth to see if the foreign body has surfaced: in such cases, making a hook with one finger (usually the index finger) can be used to try to remove the foreign body.
Read Also:
Emergency Live Even More…Live: Download The New Free App Of Your Newspaper For IOS And Android
First Aid: How To Treat A Choking Baby
How Healthcare Providers Define Whether You’re Really Unconscious
Concussion: What It Is, What To Do, Consequences, Recovery Time
First Aid: The Causes And Treatment Of Confusion
Know What To Do In Case Of Choking With Child Or Adult
Choking Children: What To Do In 5-6 Minutes?
What Is Choking? Causes, Treatment, And Prevention