
Step-by-step guide to intubation
Intubation can make the difference between life and death. Doctors and nurses perform this procedure on patients who are unable to breathe on their own
Patients may need to be intubated when they are anaesthetised during surgery or because of a serious illness affecting the respiratory system.
Healthcare workers who master this skill can help save more lives and help increase patient satisfaction rates.
Intubation is an essential step for surgery and other life-saving measures
This important skill can be both exciting and daunting for new healthcare professionals.
It is especially important for experienced registered nurses (APRNs), such as nurse anaesthetists, to learn the correct method for intubation in a healthcare setting.
What is intubation?
When entering the medical field, most aspiring nurses and healthcare professionals quickly learn the importance of proper airway management and, more specifically, the role of intubation in this process.
Endotracheal intubation is the process of inserting a tube through the patient’s mouth and into their airway.
It is performed for patients who need to be ventilated during anaesthesia, sedation or severe illness.
Nasogastric intubation is the insertion of a plastic tube (nasogastric tube or NG) through the nose, throat and stomach.
Nasotracheal intubation is the passage of an endotracheal tube through the nostril into the nasopharynx and trachea.
Orogastric intubation is the insertion of a plastic tube (orogastric tube) through the mouth.
Orotracheal intubation is a specific type of tracheal tube that is usually inserted through the mouth (orotracheal) or nose (nasotracheal).
Fibre-optic intubation is a technique in which a flexible endoscope with a tracheal tube loaded along its length is passed through the glottis.
Intubation vs. tracheostomy
Some people confuse the terms ‘intubation’ and ‘tracheostomy’. However, these two concepts are different.
Intubation is the process of inserting a tube through the mouth and then into the airway.
This procedure is performed to help the patient breathe when attached to a ventilator.
Tracheostomy is a medical procedure in which healthcare workers create an opening in the patient’s neck to insert a tube into the patient’s trachea.
This allows air to enter the lungs.
When a trachea is placed, the patient may be able to breathe without the aid of a ventilator.
Typically, a patient is intubated for the sole purpose of supplying oxygen through a machine (e.g. for surgery, sedation or illness).
What is the purpose of intubation?
Intubation is a relatively common procedure that is performed on patients who cannot maintain an airway, on patients who cannot breathe without assistance, or on a combination of both.
Common reasons for intubation
- The patient undergoes general anaesthesia.
- The patient suffers from respiratory insufficiency. There are various reasons why a patient may be too ill to breathe on his own:
- He may have suffered a lung injury.
- He may have severe pneumonia.
- He may have a respiratory problem, such as chronic obstructive pulmonary disease (COPD).
How long does it take to perform intubation?
In most cases, intubation can be performed in as little as 30 seconds.
If there are no complications, the entire process (from preparation to completion) should take no longer than five minutes.
Once completed, a supervising physician will check the placement of the tube, listen to the patient’s breathing, monitor CO2 levels or take a chest X-ray.
Who performs intubation?
Intubation can be performed by various healthcare professionals, such as physicians, anaesthetists, nurse anaesthetists and other nurse practitioners (APRNs).
Rescuers and paramedics can also perform intubation.
Intubation procedure
By reviewing the following steps, you can begin to learn more about the intubation process.
Like any other skill, intubation takes a lot of time and practice to perform correctly.
Preparation for intubation
Preparation can vary greatly from one situation to another.
If one is faced with a difficult airway, an ‘awake intubation’ is likely to be performed.
This is because a detailed airway test is time-consuming and often not feasible during an emergency.
Using a simple 1-2-3 rule for airway testing will allow you to detect potential airway difficulties in one minute or less.
Whenever possible, however, psychological preparation is always best for the patient.
Do your best to explain the procedure in elementary terms.
Sedatives can also be used to provide comfort without compromising airway patency.
According to the NCBI, other types of preparation may include ‘anaesthetisation of the airway by topical application of local anaesthetics and appropriate nerve blocks’.
Intubation steps
Here are some general guidelines to follow when intubating a patient in a controlled environment:
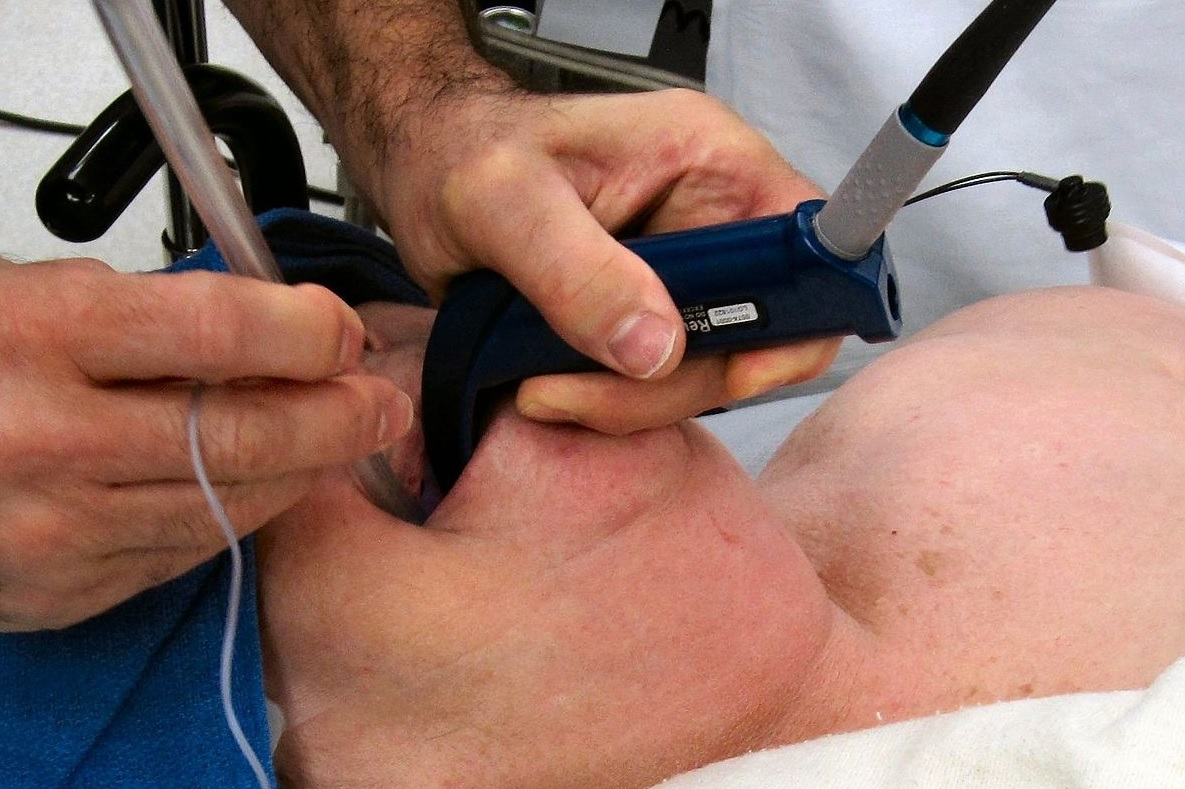
- Prior to intubation, the patient is usually sedated or unconscious so that the mouth and airway can relax. Often the patient is lying on his or her back, with the healthcare provider standing near the top of the bed, facing the patient’s feet.
- The patient’s mouth is gently opened. Using an instrument to flatten the tongue and light the throat, the tube is guided into the throat and advanced into the airway.
- A small balloon around the tube is inflated to hold it in place and prevent air from escaping. Once the balloon is inflated, the tube must be tied or taped to the mouth.
- Successful positioning is checked by listening to the lungs with a stethoscope and can be further verified with a chest X-ray.
Note: pre-oxygenation and monitoring during awake intubation are important.
The tube is much easier to remove than to place. First, remove the ties or tape holding it in place.
Then, deflate the balloon so that the tube can be carefully removed.
Nasal intubation
In some cases, the breathing tube is inserted into the nose instead of the mouth.

This is known as nasal intubation.
It is performed if the mouth or throat has been damaged or if surgery is required.
During this procedure, the nasotracheal (NT) tube enters the nose, descends down the back of the throat and reaches the upper airway.
This type of intubation, however, is much less common, as it is easier to intubate using the mouth opening. Moreover, in most cases it is not necessary.
Paediatric intubation
Although the size of the equipment is smaller, the actual intubation process is often the same for adults and older children.
However, it is important to remember that a child requires a smaller tube than an adult.
The procedure will also require a greater degree of precision, as the airway is also smaller.
Nasal intubation is preferable for infants and children.
Furthermore, there are several steps to follow to prepare a child for the procedure.
Intubation recovery
Health workers remove the tube when the patient no longer has problems breathing independently.
After the procedure, the patient may have a slight sore throat or some difficulty swallowing, but this side effect should disappear quickly.
Equipment needed to intubate a patient
The recommended equipment for endotracheal intubation is as follows:
- Laryngoscope: A metal or plastic device with a handle and a curved blade connected to a light. It is inserted into the upper part of the throat to visualise the epiglottis.
- Endotracheal tube: A thin, flexible tube with an inflatable balloon (cuff) that is inserted into the airway.
- Stylus: A thin, flexible rod or wire that is placed inside the tube to facilitate insertion.
- Syringe: This instrument is used to inflate the balloon inside the tube.
- Suction catheter: A tube to aspirate secretions and prevent aspiration.
- Carbon dioxide detector: A device used to check the position of the tracheal tube by measuring the exhaled carbon dioxide.
- Oral airway: A device that adapts to the shape of the tongue and is placed inside the mouth to keep the airway clear.
- Nasal airway: Device that keeps the nasopharyngeal airway free.
- Bag-valve mask: Mask used for pre-oxygenation, i.e. the administration of oxygen to the patient prior to intubation. This is done to prolong the ‘safe apnoea time’.
- Nasal cannula: Tube with two tips that are inserted into the nostrils and provide supplementary oxygen.
- Potential risks or complications of intubation
- Although it is generally a low-risk procedure, serious risks or complications of intubation may include some of the following conditions:
- Trauma to the teeth, mouth, tongue and/or larynx
- Accidental intubation into the oesophagus (food tube) instead of the trachea (air tube)
- Trauma to the trachea
- Haemorrhage
- Inability to be weaned from the ventilator, requiring a tracheostomy
- Aspiration of vomit, saliva or other liquids while intubated
- Pneumonia, in case of aspiration
- Sore throat
- Hoarseness
- Soft tissue erosion in case of prolonged intubation.
However, the most common reaction to intubation is a mild sore throat or (temporary) difficulty swallowing.
Many of these problems can be avoided by following the appropriate steps. It is true that practice makes perfect.
Professional tips for mastering the art of intubating
Many of our professional intubation tips concern technique, instrument knowledge and the management of difficult intubating cases.
- The initial objective is to find the epiglottis. If you insert the blade very slowly into the mouth (about 1 cm at a time), the progression will be tongue, tongue, tongue, tip of the epiglottis. This intentionally slow blade insertion technique offers the best opportunity to insert the blade into the vallecula.
- If you only see a pink mush, that is not the tongue and you have to back out. Everyone knows what the tongue looks like and the epiglottis is obviously the epiglottis. So, the only mushy thing present is the oesophagus (and technically the posterior pharynx).
- If you pass the epiglottis, you are either looking at the trachea or you have stuck the tip of the blade into the oesophagus. Keep in mind that once the oesophagus is raised, it opens like the trachea and looks like a trachea without vocal cords.
- When using a Miller (i.e. straight) blade, if the tongue moves in your view, move the blade slightly to the right of the midline of the tongue. In this way the tongue is moved to your left and is not obstructed.
- With the Macintosh blade, open your mouth wide and insert the blade on the right side of your mouth. Then rotate the handle of the blade 90 degrees so that the handle is almost facing your left ear. Advance to the depth of the epiglottis and rotate back to the normal position (perpendicular to the teeth and facing the far corner of the room).
- How to confirm that you are in the trachea during emergencies or noisy environments: Capnography is the solution. As soon as you insert a tube into the trachea, carbon dioxide comes out of the tube with each exhalation. If you have a quantitative capnometer, you immediately get a CO2 level of 30 or 40 degrees. If you have a qualitative capnometer, it will go from purple to yellow the moment you are in the trachea, but be very careful.
- The key to ventilation is to use the C-clamp technique seen in class, but be sure to pull your chin up and towards the mask. Do not press the mask to your face. Hook the chin with one finger and push it up into the mask. Try to put your little finger on the corner of your jaw and pull upwards.
If you do all these tips and still cannot see the vocal cords, it is likely that the patient is a ‘hard tube’.
You should ask someone else to intubate him or try another airway.
Read Also
Emergency Live Even More…Live: Download The New Free App Of Your Newspaper For IOS And Android
Ventilator Management: Ventilating The Patient
Intubation: What It Is, When It Is Practised And What Are The Risks Associated With The Procedure
Vacuum Splint: With Res-Q-Splint Kit By Spencer We Explain What It Is And The Protocol Of Use
Emergency Equipment: The Emergency Carry Sheet / VIDEO TUTORIAL
Cervical And Spinal Immobilization Techniques: An Overview
First Aid In Road Accidents: To Take A Motorcyclist’s Helmet Off Or Not? Info For The Citizen
UK / Emergency Room, Paediatric Intubation: The Procedure With A Child In Serious Condition
Tracheal Intubation: When, How And Why To Create An Artificial Airway For The Patient
Endotracheal Intubation: What Is VAP, Ventilator-Associated Pneumonia
Sedation And Analgesia: Drugs To Facilitate Intubation
AMBU: The Impact Of Mechanical Ventilation On The Effectiveness Of CPR
Manual Ventilation, 5 Things To Keep In Mind
FDA Approves Recarbio To Treat Hospital-Acquired And Ventilator-Associated Bacterial Pneumonia
Pulmonary Ventilation In Ambulances: Increasing Patient Stay Times, Essential Excellence Responses
Microbial Contamination On Ambulance Surfaces: Published Data And Studies
Ambu Bag: Characteristics And How To Use The Self-Expanding Balloon
Anxiolytics And Sedatives: Role, Function And Management With Intubation And Mechanical Ventilation
Bronchitis And Pneumonia: How Can They Be Distinguished?
New England Journal Of Medicine: Successful Intubations With High-Flow Nasal Therapy In Newborns
Intubation: Risks, Anaesthesia, Resuscitation, Throat Pain
What Is Intubation And Why Is It Done?
What Is Intubation And Why Is It Needed? Insertion Of A Tube To Protect The Airway
Endotracheal Intubation: Insertion Methods, Indications And Contraindications
Ambu Bag, Salvation For Patients With Lack Of Breathing
Blind Insertion Airway Devices (BIAD’s)
Airway Management: Tips For Effective Intubation